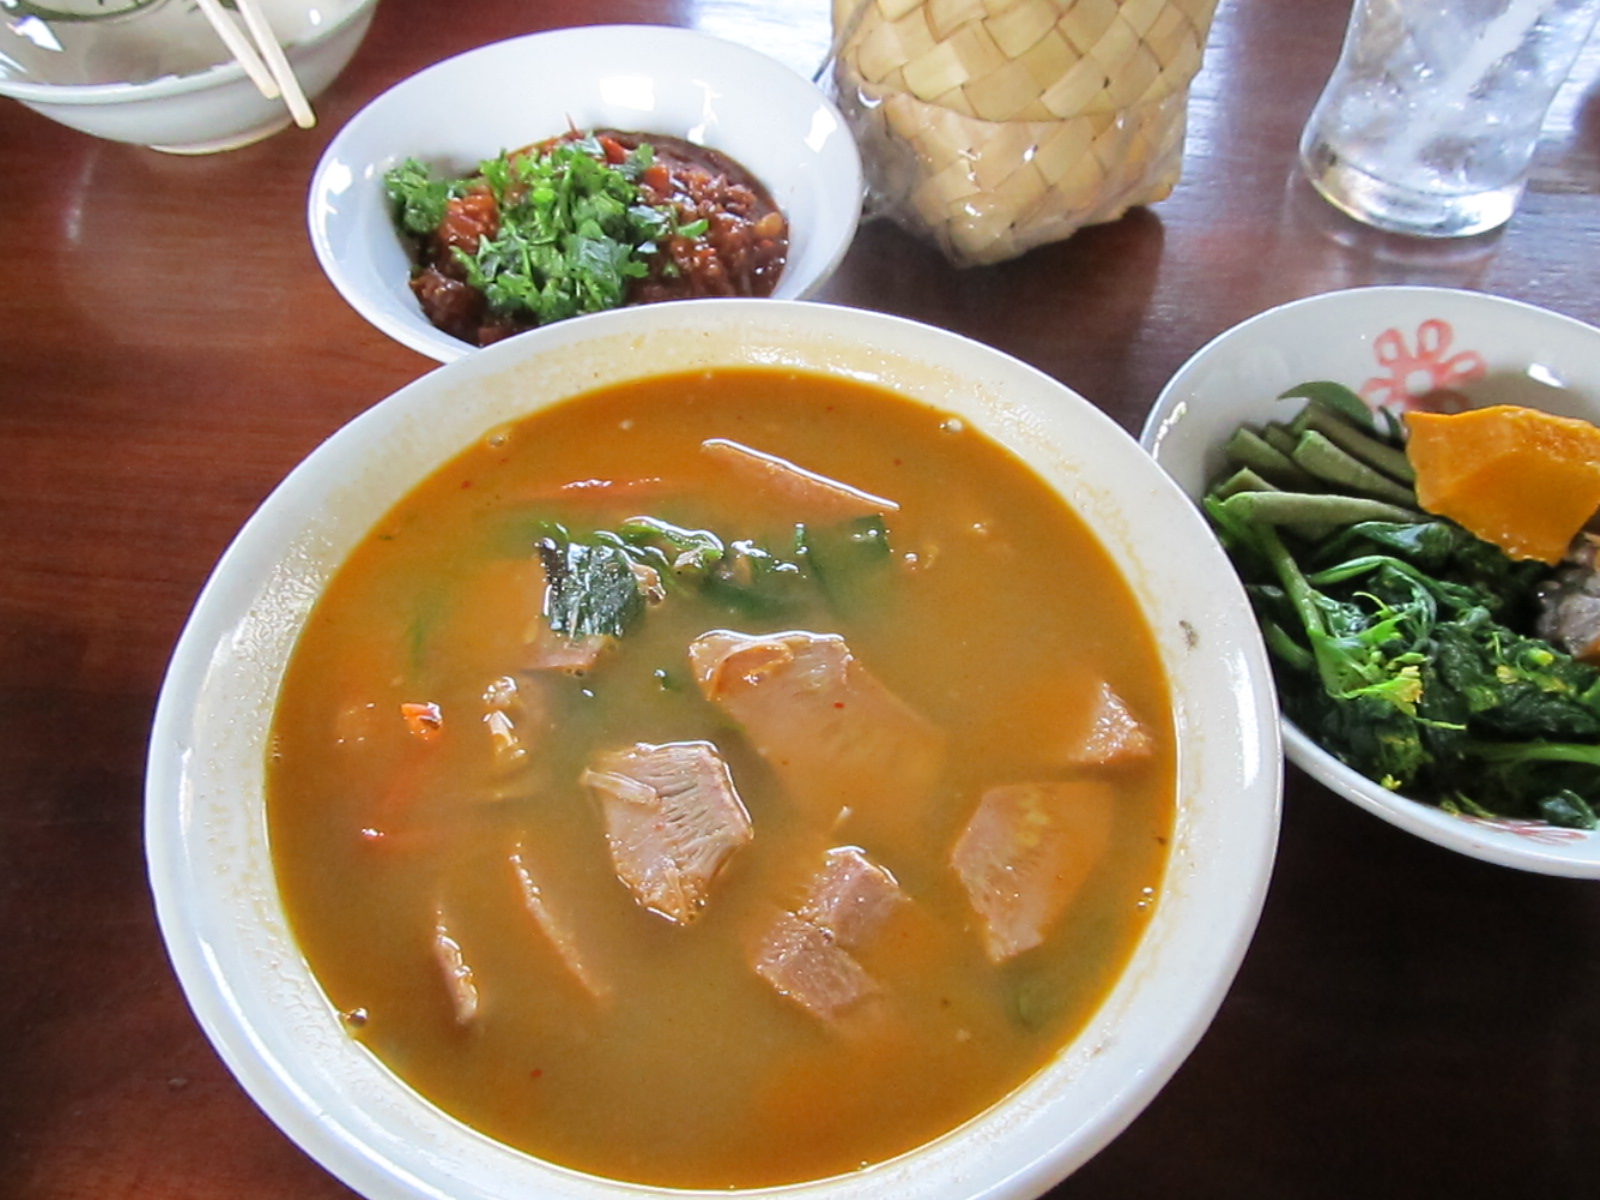
กิน อาหาร (Mae Chaem, Thailand)

Thai Language Lesson:
Kin: กิน (pronounced: ghaen); to eat.
Aa-hăan อาหาร (pronounced: aar-haan); food.


I just returned from a weeklong homestay in the Mae Chaem district; part of the Chiang Mai province in Northern Thailand. It was quite a winding drive to get there, but after only 3 short hours we arrived in the most beautifully serene village, nestled in a small valley up in the mountains.

Doi Inthanon, Thailand's highest mountain (8,415 ft high) is also located in the Mae Chaem district and I was able to see it clearly during our trek outside the village one day.


Aa-hăan (food) in Mae Chaem was pretty delicious! I felt extremely spoiled to have 3 home-cooked meals prepared for me everyday for 5 days. Upon arriving in the village, our group of 27 students was divided into groups of 3 and introduced to our host families. Jennifer (32 from Pitzer College in California) and Victoria (19 from Simpson College in Iowa) were my roommates for the week. We hardly knew each other when we arrived, but we left the village closer than we imagined I am sure. I loved getting to know each of them and I'm excited to have made a few more friends here in Chiang Mai.My experiences in Mae Chaem were incredible. I learned so much from my host family, Maw, Paw, Grandma, and Pimm (their eldest daughter, 37). The 7 of us lived together, in close quarters for the week we stayed, but every moment was priceless! I should also mention that no one in my family spoke any English. We relied soley on sign-language, Jen's Lonely Plant Thai-English dictionary, and our few Thai phrases that we had learned to communicate everything. It was a huge challenge, but it taught me to be patient, observant, and gracious in manner.
Maw and Paw enjoying their homemade rice whiskey (mis-si-key)

Pimm (in the background of the above photo) was our main chef for the week. We all woke up around 6:30 when the rooster crowed: consistently, loudly, and obnoxiously. Pimm would then answer to Maw's call to make breakfast, roll out of bed, and heat up the wok. The entire "kitchen" and dining area was outside, typical in traditional Thai homes. Jen, Victoria, and I would lay in bed until around 7:30; smelling the waft of eggs and pork frying from our open windows, hearing the oil crackling, and listening to Maw and Paw laugh at Grandmaw (who was usually still drunk from the night before). Finally, after what sounded like a call for "Kin or Aa-haan," we would roll off our beds (mats) and walk downstairs to a table full of hot plates and huge bowls of rice for each of us.This was the same routine for dinner around 6 pm each night; only we were usually just finishing our showers or lying on the ground trying to escape the heat. We also tried to stay upstairs as long as we could before dinner because rice whiskey shots began around 4:30 in our house, and we learned real fast that we couldn't keep up unless we waited until around 6:00 pm for shot-time.Maw and Grandmaw dancing and singing on a particularly wild night Photo credit: Gaby Corbera

There was actually little to no variation between the food served for breakfast, lunch, and dinner. Breakfast almost always consisted of one large omelet plate, stir-fried bean sprouts with onions, and either some form of stir-fried pork with garlic or another side of stir-fried greens with garlic. Lunch and dinnner varied from an assortment of stir-fried vegetables, fried or grilled fish, fried chicken, stir-fried pork and eggs, fried hard boiled eggs with sweet and sour sauce, or a soup made with meat, greens, and herbs.
Scrambled eggs with larvae? I seriously struggled to eat this but Maw and Pimm were so excited by the delicacy of this dish that I had to stomach a few bites to avoid being rude.
This is one of my favorite "prik" (chili) sauces. Paw would make it fresh each night by simply slicing green chilis in fish sauce with fresh lemon or lime juice and crushed garlic.

Traditional Chiang Mai Lunch

Each region of Thailand (Southern, Central, and Northern) is recognized for its unique style of Thai cuisine. Northern Thailand is often noted for having the best fare! I would have to agree, although I am a bit bias living in Chiang Mai. Today, I joined two other Americans and two local Thais for lunch at Huen Jai Yong เฮือนใจ๋ยอง. We enjoyed many of the traditional Northern Thai "share dishes and ended with a refreshing Thai dessert. This is by far my favorite meal since arriving in Chiang Mai :)Beautiful garden view as we walked up the stairs to our rooftop dining...
we removed our shoes and sat on the ground, traditional Northern Thai style.


Luckily, we had De Pang and "Spicy" (our two Thai friends) with us to order from the Thai only menu.
We had no clue what they ordered until it arrived - even then I wasn't sure what I was eating. But needless to say, we were pleasantly surprised when two Thai servers delivered an incredible array of colorful dishes.
Kaeng Kanun (แกงขนุน) Jackfruit curry/soup: Most Northern Thai curries do not contain coconut milk. This curry was more like a soup but with pork ribs, young jackfruit, various veggies, tomatoes, herbs and spices, and shrimp paste.
Ham-Prik-Noon: A popular side dish in Chiang Mai consisting of roasted green chilis, garlic, and onion, and some other herbs I presume. Very spicy but super delicious with sliced vegetables or sticky rice. This is one of my favorite side dishes.
Kang Hung Lay (Northern Pork Curry/Stew): I am dying to know how to make this dish! It was incredible. Rich flavors with julienned ginger root and perfectly tender pork. Yum! *Wikipedia says: a Burmese influenced stewed pork curry which uses peanuts, dried chilies and tamarind juice in the recipe but containing no coconut milk.
Sai Oua (Northern Style Sausage): If you like Louisiana sausage this is your dish but with Thai flavors! Delicious pork and chicken sausage with fresh and dried herbs and aromatics. Behind the sausage is what I like to call a Thai omelet with onions, greens, chili, and chicken topped with fresh cilantro.
They brought us both brown and white sticky rice :)
Delicious fare! I will be back...
How could I forget dessert?! Lot chong nam kathi: pandan flavored rice flour noodles in coconut milk and shaved ice.

Nat's Knack in Thailand!

What an amazing opportunity! On January 11, I landed in Bangkok, Thailand to begin my 5 month stay in Southeast Asia. I have not stopped smiling since I landed here. Everything about this country is beautiful: the people, the landscape, the fruits, the vegetables, the candies, the garments, the art, the temples... I am in a constant state of awe.

I absolutely love the purity of the food here. Every dish is made from scratch with fresh ingredients close to their source. I have visited local pomelo and fruit farms, seen jackfruits growing on nearly every tree along the road, tasted Thai kale, basil, and bok choy in almost every dish.

I wish I could share every meal with you, but I will spare you the endless picture reel and highlight my two favorite meals since arriving in Thailand. The first meal was enjoyed in Bangkok along the river, the second was my lunch today in Chiang Mai (where I will be living for the next 2 months). Both meals were incredible but distinctly different.
Riverside Lunch - BANGKOK

I don't remember the name of this drink but I think it's safe to call it "Liquid Greens." A bit too earthy for my liking, but it might grow on me?
Best duck in town! Tender and savory.
Traditional fish dish for this area of Thailand. My favorite dish on the table, sweet and savory. I think I ate an entire fish to myself I loved it so much!
Nuy, our guide, explained that when eating Thai "family style" it is important to take one bite at a time as to enjoy the individual flavors of each dish. She explained that each dish has a unique blend of flavors that should not be mixed with others. I love the appreciation for food as an art here.
Sweet and sour sauteed vegetables with shrimp.
Long boat to visit the orchid farm, pomelo fruit farm, and lotus farm.

You know you have a best friend when...

Today Milena and I decided to have our last lunch "date" before embarking on our exciting journeys abroad next semester. She is truly the best thing to happen to me since I moved to Charleston last January. If you have been following my blog even remotely, you have probably noticed that Milena acts as my right hand in nearly everything. It's hard to call it chance when someone as remarkably compatible, adventurous, loving, loyal, fun, funny, intelligent, talented, challenging, and beautiful of a person enters your life. Because of this, I know that God undoubtedly had a hand in Milena and I meeting last January. For this I am forever thankful.

Onto lighter things and foodie talk :) Today, with little hesitation, we agreed to try the newest Mexican restaurant, Caliente, in West Ashley known for it use of fresh and local Lowcountry ingredients.

In addition to the excitement of trying something new, we also decided to use this time together to exchange Christmas gifts.
We had barely settled in our seats before we were greeted with house-made corn tortilla chips and a fresh, spicy salsa!
And before I could ask the server for a water, Milena chimed in, "and we would like to start with your fresh guacamole." We had both read a review before coming to Caliente that described their guac as the new "standard." Our review: Simple, uncontrived avocados with fresh and chunky tomatoes. Quite delicious!
Milena and Santa have a dance off...
As per usual, we wanted to try everything on the menu so we decided to split two of their lunch specials. First shown, veggie fajitas with black beans.
Second, chicken taco and steak enchilada with Mexican rice
We hated everything. Lies. But we both agreed that our favorite element was the cheesy steak enchilada followed by the most flavorful element, the sauteed vegetables in the fajita dish.
Best friends are great at a lot of things, but have you ever realized how well they gift?! Milena nailed it by creating and writing the most thoughtful card and giving me the most unique ring handcrafted by a local Charlestonian. The "thank you" symbolizes the most simplest of prayers - giving thanks.

Balsamic Glazed Winter Vegetables

Skillet Balsamic Glazed Winter Vegetables
Adapted from MyKitchenAddiction.com
(Serves 3-4)
* 2 tablespoons extra virgin olive oil
* 3 cloves garlic, minced
* 12 ounces mixed baby potatoes, quartered
(I used purple-skinned and fingerling potatoes)
* 8 ounces Brussels sprouts, trimmed and quartered
* 1/2 teaspoon dried thyme
* 1/4 – 1/2 teaspoon Kosher salt (to taste)
* 1 tablespoon good quality Balsamic vinegar
* Drizzle of honey (optional)

1. Heat a large skillet over medium-low heat. Add the olive oil to coat the bottom of the skillet. Add the garlic, potatoes, and Brussels sprouts. Add the dried thyme and 1/4 teaspoon of salt. Stir to evenly coat the vegetables with the oil and thyme.
2. Let the potatoes and Brussels sprouts caramelize on one side for about 4-5 minutes. Stirring occasionally to make sure that the other sides of the potatoes and Brussels brown evenly, continue to cook until fork tender (about 10-15 additional minutes).
3. Drizzle the Balsamic vinegar over the vegetables. Toss in the skillet so that the vegetables are evenly coated and the vinegar thickens a bit. Adjust the seasonings to taste and serve immediately.

Simple Beet and Goat Cheese Salad

This might just be the simplest and most delicious 3 ingredient salad! I bought some beautiful red and golden beets at the Farmer's Market last Saturday, as well as some of the best looking and spiciest arugula I have ever seen and tasted.

Preheat your oven to 450 F. To prepare the beets: Simply wash them, trim (cut-off) the roots, wrap them in foil and let them roast in the oven for 50 minutes. While the beets are in the oven, I prepare my dressing: whisk together 3 tbsp olive oil, 2 tbsp orange juice, 2 tbsp champagne or white wine vinegar, fresh chiffonaded basil, salt and pepper. Once the beets are done, and can be easily pierced by a fork, let them cool. Then you can peel off the skin and thinly slice the beets placing them over a bed of arugula and lettuce blend. Lastly, dress your salad with the fresh vinaigrette and crumbled goat cheese.

I also LOVE to add "crunch" to my salad by spreading goat cheese on seeded flat bread crackers, then breaking them up into mini croutons all over the salad. The addition of the "make shift croutons" really sets this salad apart :) My favorite cracker to use is Suzie's Spelt Multiseed Flatbread

Eggplant Pizza


It's about that time of the month where I try to be a little less extravagant and a bit more frugal with my money. In the kitchen this means things get extremely creative! Around mid-day yesterday, I decided I wanted something savory and went to the fridge only to find some cheese, one eggplant, one tomato, half an onion, and one remaining naan bread from a dinner I made earlier this week. My thoughts - Naan bread pizza of course!

But how was I going to incorporate eggplant?? I searched around some food blogs for a minute and came up with a quick, delicious recipe for a vegetable pizza.

Garden Eggplant Pizza
Ingredients
(Recipe yields: 2 Naan bread pizzas or 1 large pizza)
* 1 large eggplant, peeled
* 1 medium tomato
* 1 red bell pepper
* 1 onion
* 1 small zucchini (optional)
* 1 large garlic clove, minced
* 3 tablespoons olive oil, divided
* 2 fresh Naan breads (or pizza dough to make 1 large pizza)
* 1 cup shredded mozzarella cheese
* Freshly grated Parmesan cheese
* 1/2 teaspoon dried basil (or fresh basil chiffonaded)
* 1/2 teaspoon dried oregano
* 1/2 teaspoon dried thyme
* 1/2 teaspoon salt
* 1/4 teaspoon freshly ground pepper

Preparation
Chop eggplant and next 4 ingredients coarsely; saute garlic in 1 tablespoon oil (just long enough to infuse the oil); sauté vegetables in garlic oil in a large skillet over medium-high heat 10 minutes or until tender.
Layer pizza crust evenly with cheese and eggplant mixture; sprinkle with basil and next 4 ingredients. Drizzle with remaining 2 tablespoons oil.

Bake at 425° for 10 minutes or until golden.

Second Batch: Pumpkin Granola

WOW! This batch came out perfect! If you are craving a delicious, clumpy, fall-inspired granola please try this recipe ;)

Nutty Pumpkin Granola (inspired by Ellie Krieger's recipe)
Ingredients:
1.5 cups rolled oats
1/4 cup chopped raw or slivered almonds
1/4 cup chopped walnuts (cashews)
1/4 cup pepitas
2 tbsp wheat germ (optional)
2 tbsp flax seeds (optional)
1/8 tsp. salt
3/4 tsp. cinnamon
1/8 tsp. nutmeg
1/4 tsp. cloves
1/8 tsp. ginger
1/8 tsp. allspice
1/3 cup pumpkin puree
1/2 tsp. vanilla extract
1/3 cup pure maple syrup
1/3 cup dried cranberries (I added golden raisins, chopped dried figs, apricots)

Preheat the oven to 300 and spray a baking sheet with nonstick spray.

Mix together the oats, nuts, salt, and spices. Then, stir in the pumpkin puree, vanilla, maple syrup and cranberries. Be sure everything is well combined.

Spread the mixture onto the prepared baking sheet and bake for 30-40 minutes, stirring occasionally, until golden brown and crisp. The granola will crisp up a bit more after it’s out of the oven, too. And when I am craving a healthy snack/dessert, I combine all my favorite things with Greek yogurt. It's the simple things in life...

Pumpkin Madness

Pumpkin Spiced Granola
I used my original recipe, left out the orange zest, added pumpkin spices, and a touch of Godiva's Pumpkin Spiced Coffee grains :)

One of my favorite ways to enjoy homemade granola is over a bowl of Greek yogurt with fresh berries and a drizzle of honey!


Almost two weeks ago, Milena and I went on a pumpkin puree baking binge! We got very excited about the Fall weather, holidays, and foliage and decided to celebrate with cans and cans of pumpkin puree. Ok I am kidding, only sort of, but we did decide to bake everything pumpkin on the Friday before Halloween. Most of the baked goods were sent to a Halloween party for a club Milena is involved with at the College, but the rest were for our enjoyment!

*The next two recipes were adapted and made Gluten-free due to Milena's allergy, however I have posted the recipes using the original ingredients
Soft Pumpkin Chocolate Chip Cookies
(adapted from here)
Yields: about 16 large cookies
2 cups whole wheat flour
1 1/2 tsp. baking powder
1 tsp. baking soda
1/2 tsp. salt
2 tsp. ground cinnamon
1/2 tsp. ground ginger
1/4 tsp. grated nutmeg
1/4 tsp. ground cloves
2 eggs
3/4 cup sugar
1/4 cup canola oil
1 1/4 cup canned pumpkin
1 tsp. vanilla extract
1 cup dark chocolate chips

Preheat oven to 325 F. Line two baking sheets with silicone baking mats or parchment paper, set aside. Stir together the flour, baking powder, baking soda, salt and spices together in a medium bowl and set aside. In a large bowl, beat the eggs and sugar until smooth and lightened in color. Next, mix in the oil,
pumpkin and vanilla until well combined. Mix in the flour to incorporate. Mix in the chocolate chips.
Using an ice cream scoop (1/4 cup size), scoop mounds of the dough onto the prepared baking sheets, spacing the cookies at least 2 1/2 inches apart. Use a thin metal spatula to smooth and flatten the rounds. Bake until tops feel firm and an inserted toothpick comes out clean, about 16 minutes. Cool on the baking sheet then transfer to a wire rack to cool completely.


Mini Pumpkin Cupcakes with Chocolate Drizzle
(adapted from here)

Dry ingredients:
1/2 cup blanched almond flour (also called almond meal)
1/4 cup millet flour
1/4 cup arrowroot starch
1/2 tsp. baking soda
1/2 tsp. ground cinnamon
Pinch of sea salt
Wet ingredients:
2 tbs. extra virgin olive oil
1/4 cup maple syrup
1/2 cup unsweetened applesauce
3/4 cup pumpkin puree
1/4 tsp. ground turmeric, optional
For the chocolate drizzle:
6 tbs. dark chocolate chips
1 tsp. vegetable oil

Preheat oven to 350 degrees F. Lightly oil 12 cups of a mini-muffin tin with coconut or olive oil. Set aside.
In a large bowl, whisk together the dry ingredients. In a smaller bowl, whisk together the wet ingredients. Stir the wet ingredients into the dry with a wooden spoon until smooth. Divide batter evenly among greased muffin cups, filling each all the way to the top.
Bake cakes until a toothpick inserted into the center comes out clean, 24-26 minutes. Allow to cool completely before removing from pan. (Run a sharp knife around the edge of each cake to help release it from the pan.)
For the chocolate drizzle: melt together the chocolate chips and coconut oil over very low heat in a small saucepan, stirring often to avoid burning the chocolate. When chocolate is melted and smooth, remove from heat. Drizzle chocolate over top of the cooled cupcakes using a teaspoon. Transfer cupcakes to refrigerator to set up the chocolate.
Store cupcakes in the refrigerator until ready to serve, or up to 2 days. Bring to room temperature before serving.


These were so cute and delicious!